Cloudflare Workers に Python のスクリプトをデプロイできたので、その過程をメモっておきます。
概要
以前 Yapps にて公開した乱数生成アプリを Cloudflare workers に移行できないかと思い、いろいろ調べてました。
どうやら Cloudflare Workers は JavaScript と TypeScript、それから WASM にしか対応していないようで、Python は原則利用不可のようです。
Languages · Cloudflare Workers docsLanguages · Cloudflare Workers docs
ただし、それはあくまでも原則の話。Python スクリプトを JavaScript に変換する Transcrypt を用い、JavaScript の worker として公開することは可能です。
Cloudflare 公式でもサンプルリポジトリが公開されています。
GitHub - cloudflare/python-worker-hello-world: Python hello world for Cloudflare Workers
今回はこれを利用して、Python スクリプトを Cloudflare Workers にデプロイするところまでの手順を書き残しておきます。
環境
-
macOS 14
-
Python 3.9.12
-
npm 10.2.4
-
webpack 5.76.0
-
wrangler 3.28.1
-
Transcrypt 3.9.0
やったこと
1. node.js のインストール
え、そこから?と思われるかもしれませんが、筆者の環境にはそもそも node.js をインストールしてなかった(あるいはインストールに失敗してた?)ようで…
wrangler をインストールしようとすると dyld error が出現しました。
% npm install -g wrangler
dyld[4707]: Library not loaded: /opt/homebrew/opt/icu4c/lib/libicui18n.72.dylib
  Referenced from: <8CDF1DD1-78F4-347E-B205-0C5D10A74B3C> /opt/homebrew/Cellar/node/20.2.0/bin/node
  Reason: tried: '/opt/homebrew/opt/icu4c/lib/libicui18n.72.dylib' (no such file), '/System/Volumes/Preboot/Cryptexes/OS/opt/homebrew/opt/icu4c/lib/libicui18n.72.dylib' (no such file), '/opt/homebrew/opt/icu4c/lib/libicui18n.72.dylib' (no such file), '/usr/local/lib/libicui18n.72.dylib' (no such file), '/usr/lib/libicui18n.72.dylib' (no such file, not in dyld cache), '/opt/homebrew/Cellar/icu4c/73.2/lib/libicui18n.72.dylib' (no such file), '/System/Volumes/Preboot/Cryptexes/OS/opt/homebrew/Cellar/icu4c/73.2/lib/libicui18n.72.dylib' (no such file), '/opt/homebrew/Cellar/icu4c/73.2/lib/libicui18n.72.dylib' (no such file), '/usr/local/lib/libicui18n.72.dylib' (no such file), '/usr/lib/libicui18n.72.dylib' (no such file, not in dyld cache)
zsh: abort      npm install -g wrangler
というわけで、brew install node で node.js を(再?)インストールします。
% brew install node
2. wrangler のインストール
% npm install -g wrangler
...
10 packages are looking for funding
  run `npm fund` for details
npm notice
npm notice New minor version of npm available! 10.2.4 -> 10.4.0
npm notice Changelog: https://github.com/npm/cli/releases/tag/v10.4.0
npm notice Run npm install -g npm@10.4.0 to update!
npm notice
3. wrangler でログイン
% wrangler login
実行するとブラウザが開きます。ブラウザで Cloudflare アカウントにログインします。
4. 作業ディレクトリの作成
% mkdir my-python-worker
% cd my-python-worker
適当な名前でディレクトリを作成しておきます。
5. サンプルリポジトリの clone & npm install
% wrangler generate my-python-worker https://github.com/cloudflare/python-worker-hello-world
[GitHub - cloudflare/python-worker-hello-world: Python hello world for Cloudflare Workers] からリポジトリを clone します。my-python-worker は自分で設定したプロジェクト名にしておきます。
clone が完了したら npm install しておきます。
% cd my-python-worker
% npm install
6. virtualenv の作成
Transcrypt 用の Python virtualenv を env ディレクトリに作成します。Python 3.7 以上であることが必須です。
% virtualenv env
% source env/bin/activate
% pip install transcrypt
7. ローカルホストで動かしてみる
サンプルの Python スクリプトは既に my-python-worker/index.py に同梱されています。
def handleRequest(request):
    return __new__(Response('Python Worker hello world!', {
        'headers' : { 'content-type' : 'text/plain' }
    }))

addEventListener('fetch', (lambda event: event.respondWith(handleRequest(event.request))))
Python Worker hello world! と返すだけのスクリプトです。
これを localhost で動かしてみます。
7.1 webpack のインストール
…とその前に、webpack が入っていなかったのでインストールします。
% brew install webpack
7.2 wrangler.toml の編集
本当は後で設定すればいいはずですが、どうも wrangler.toml の route の設定がデフォルトの状態(空白)のままだとビルドが通らないっぽくて…
% wrangler dev
 ⛅️ wrangler 3.28.1
-------------------
▲ [WARNING] Processing wrangler.toml configuration:

    - The "account_id" field in your configuration is an empty string and will be ignored.
      Please remove the "account_id" field from your configuration.


Running custom build: npm run build

> @1.0.0 build
> webpack -c webpack.config.js

asset main.js 17.9 KiB [emitted] [minimized] (name: main)
orphan modules 62.3 KiB [orphan] 2 modules
./index.py + 2 modules 62.3 KiB [built] [code generated]
webpack 5.76.0 compiled successfully in 2168 ms

✘ [ERROR] Cannot infer host from first route: {"pattern":"","zone_id":""}.

  You can explicitly set the `dev.host` configuration in your wrangler.toml file, for example:

      ```
      [dev]
      host = "example.com"
      ```
とりあえず route の設定はコメントアウトしておきます。
name = ""
account_id = ""
workers_dev = true
# route = { pattern = "", zone_id = ""}  ← これ
main = "dist/main.js"
compatibility_date = "2022-06-03"

[build]
command = "npm run build"
7.3 実行
% wrangler dev
でローカルホストで実行できます。
 ⛅️ wrangler 3.28.1
-------------------
Running custom build: npm run build

> @1.0.0 build
> webpack -c webpack.config.js

asset main.js 17.9 KiB [compared for emit] [minimized] (name: main)
orphan modules 62.3 KiB [orphan] 2 modules
./index.py + 2 modules 62.3 KiB [built] [code generated]
webpack 5.76.0 compiled successfully in 701 ms
⎔ Starting local server...
[wrangler:inf] Ready on http://localhost:8787
[wrangler:inf] GET / 200 OK (6ms)
[wrangler:inf] GET /favicon.ico 200 OK (2ms)
╭───────────────────────────────────────────────────────────────────────────────────────────────────────────╮
│ [b] open a browser, [d] open Devtools, [l] turn off local mode, [c] clear console, [x] to exit            │
╰───────────────────────────────────────────────────────────────────────────────────────────────────────────╯
⎔ Shutting down local server...
こんな表示が現れますので、b を入力してブラウザで開いてみます。
すると…
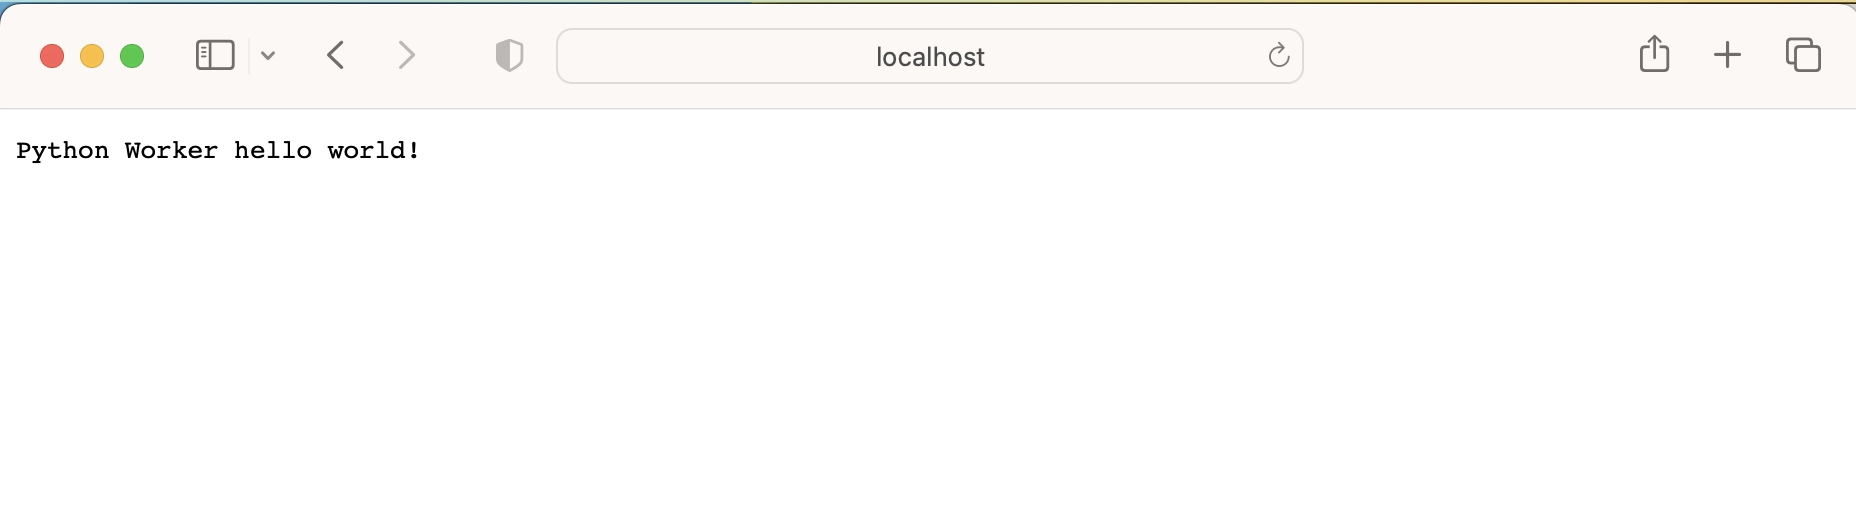
実行できました!
8. Cloudflare workers にデプロイする
いよいよデプロイします。
まずは wrangler.toml を自分のアカウントに設定しておきます。
ここで最低限必要なのは以下の通り。
-
name:アプリケーション名 -
account-id:Cloudflare アカウント ID
また、自分の独自ドメインで公開したい場合は route の設定もします。Cloudflare workers のデフォルトの サブドメイン(***.workers.dev)での公開で良ければ route はコメントアウトしたままで OK です。
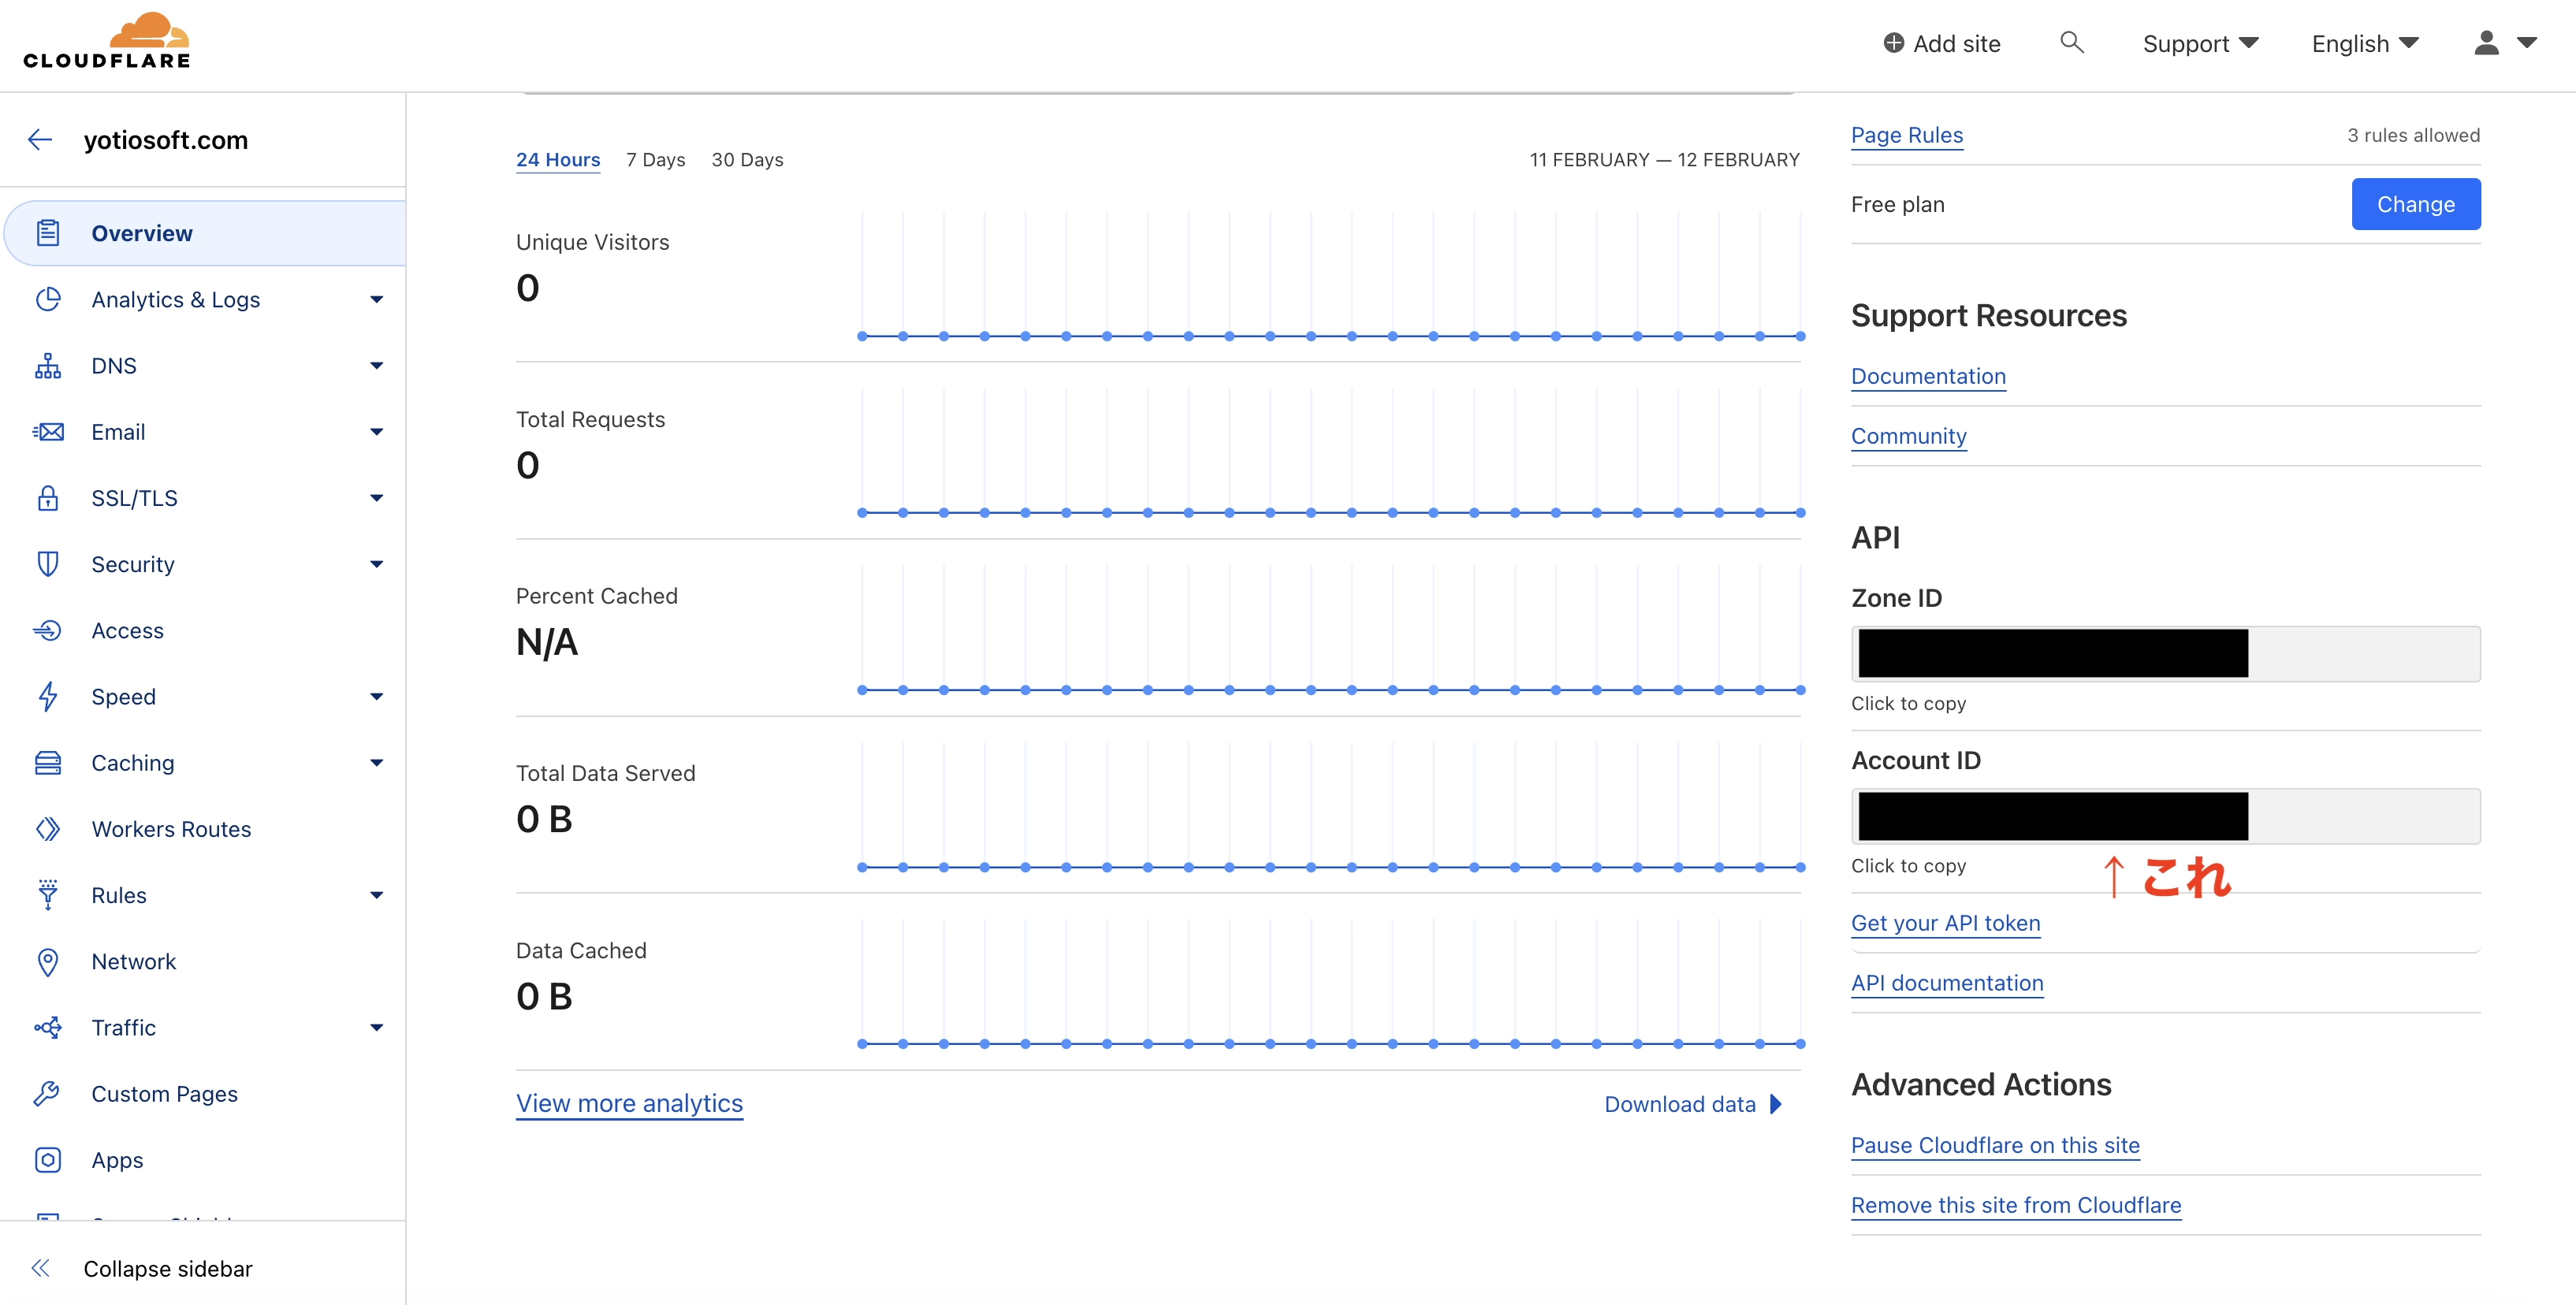
8.1 account_id を確認する
参考:Find zone and account IDs · Cloudflare Fundamentals docs
ここちょっと戸惑ったのですが、account id とはメールアドレスのことではなく、Cloudflare の Overview ページに表示されている自動で割り当てられる ID のことでした。
8.2 wrangler.toml を設定する
name = "my-python-worker"
account_id = "[自身の Accound ID]"
workers_dev = true
# route = { pattern = "", zone_id = ""}
main = "dist/main.js"
compatibility_date = "2022-06-03"

[build]
command = "npm run build"
name は好きに設定して OK です。デプロイしたときに Cloudflare workers 側で自動でアプリケーションを生成してくれます。
8.3 デプロイ
最後にデプロイします。
% wrangler publish
 ⛅️ wrangler 3.28.1
-------------------
▲ [WARNING] `wrangler publish` is deprecated and will be removed in the next major version.

  Please use `wrangler deploy` instead, which accepts exactly the same arguments.


Running custom build: npm run build

> @1.0.0 build
> webpack -c webpack.config.js

asset main.js 17.9 KiB [compared for emit] [minimized] (name: main)
orphan modules 62.3 KiB [orphan] 2 modules
./index.py + 2 modules 62.3 KiB [built] [code generated]
webpack 5.76.0 compiled successfully in 654 ms
Total Upload: 27.31 KiB / gzip: 5.89 KiB
Uploaded my-python-worker (0.96 sec)
Published my-python-worker (0.33 sec)
  https://my-python-worker.ytani0323.workers.dev
デプロイ後、表示された URL にブラウザでアクセスしてみます。
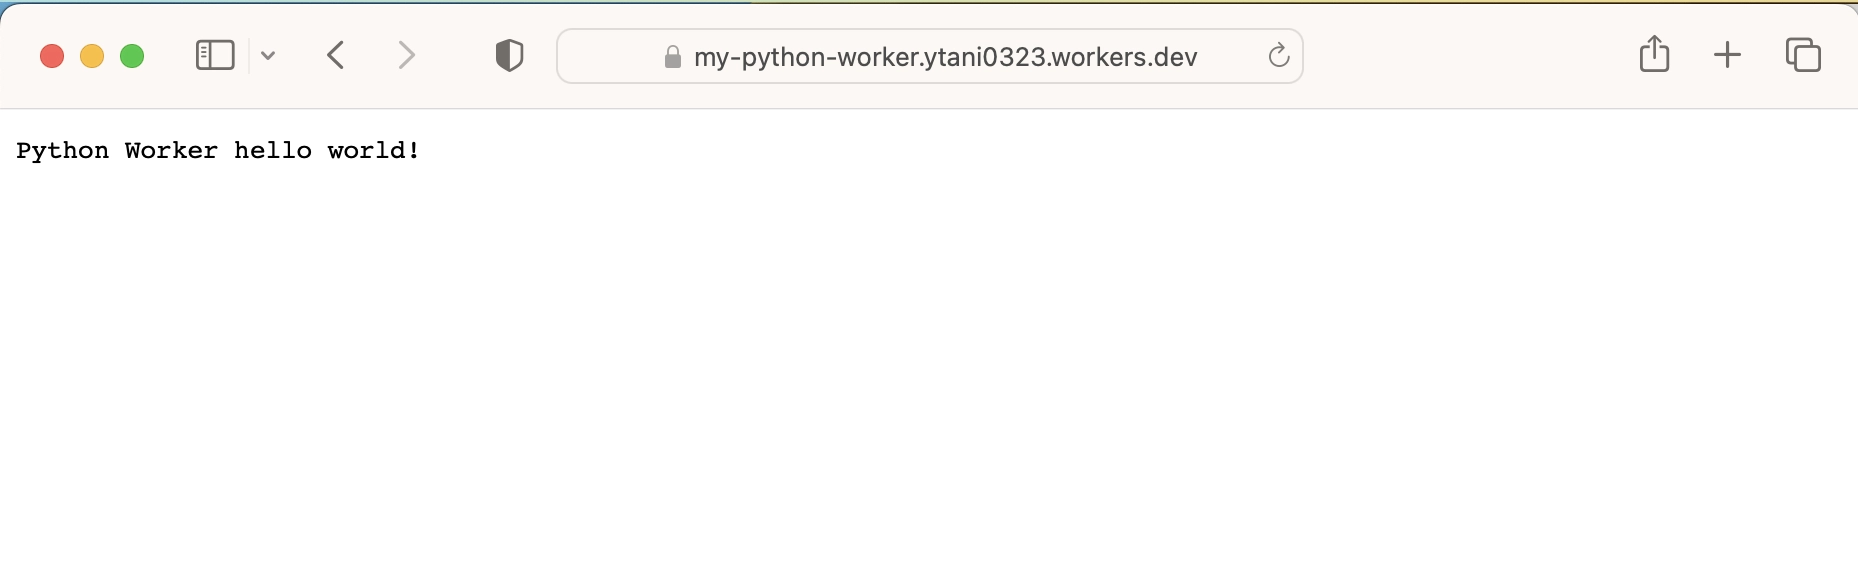
こちらも動作が確認できました。
おわりに
あくまでも Transcrypt は Python スクリプトを JavaScript に変換するだけなので、どこまでできるかは注意しておく必要がありそうです。(今の乱数生成 API、Flask 使ってるんだけど…多分そのままじゃ無理だろうなぁ…)